Intro
Now that you know how to use GIT locally on your machine, it's time to take your development routine to a new level: remote repositories. Most of you probably know GitHub or Bitbucket, famous code-hosting services that allow you to store a copy of your local repos on their servers. We'll discuss what remote repos are good for and will create one on Bitbucket.
Prerequisites:
- GIT basics, as explained in Part 1 of this tutorial series
- basic command line skills
So let's get startet with the advantages of remote repositories :)

Advantages of remote repos
Just imagine working with other developers on a project, let's say an iOS App. Each developer has assigned a specific feature that should be implemented.
In order to test the behavior of their own feature in combination with the ones from the other team members, they require the most current version of the app. Without remote repositories, this is almost impossible.
There is no efficient way for them to stay up-to-date all the time without making use of remote repositories.
Using a remote repository, all devs could synchronize their local repo with it and pull the newest changes the other devs made.
Even if you're working alone, remote repos are still useful for you as they backup your project. If your laptop dies, you can simply download the newest version of your remote repo and continue working on it.
Sounds cool, right? It is.

Creating your Bitbucket account
Now that you're in love with remote repositories, we'll create one right away. Head over to bitbucket and create an account (or sign in).
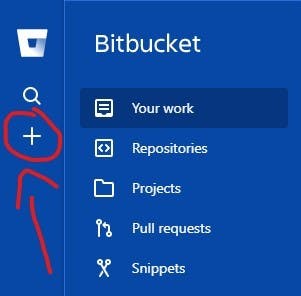
Once you're signed in, click on the plus icon:

Now, under "create", select repository.
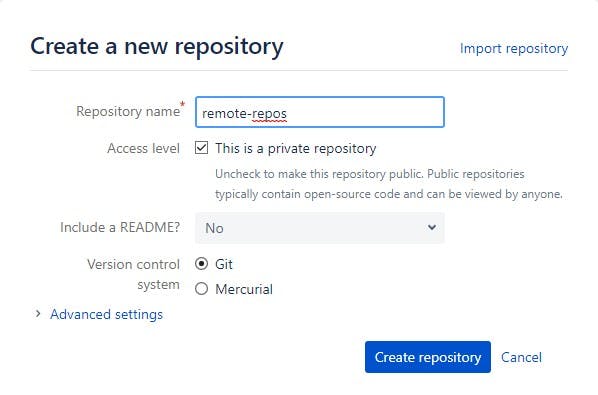
Give the repository a name, leave the advanced settings as-is and make sure that GIT is selected as the repo's version control system (VCS). It should look something like this:

Click Create Repository.
Congrats, you've successfully created your own repo on bitbucket :) Now we'll initialize a local repository on your machine and connect it to the one on bitbucket. Yaaaasssss!

Creating & Connecting your local repository
Create a folder somewhere on your machine and use the terminal to move into it. Run this command to initialize GIT:
> git init
If you need further explanation on what I'm doing here, check out Part 1 of the "GIT for beginners" tutorial series.
After you've created the local repository, create a helloworld.txt file inside of it and add some text:
Cupcake ipsum dolor sit amet. Oat cake dragée bear claw I love pudding jujubes I love dragée chupa chups. Tart biscuit gummies chocolate I love jujubes muffin lollipop pudding. Cake macaroon jelly fruitcake tart bonbon sweet roll I love sweet.
This text was generated by Cupcake Ipusm.
Save the file and close it. Now, we'll stage & commit that file to our local repository.
Therefore, run the following commands:
- Stage
> git add .
- Commit
> git commit -m “This is my supercool commit message. It should be very descriptive.”
⚠️ If you get an error message from GIT complaining that some information about you (name & email) is needed, check out Part 1 of the "GIT for beginners" tutorial series - more specifically, the "Basic Commands" section. In there, I explain what it means and how to fix it.
Very nice. Your local repository has its first commit. Now, we want to bring that commit to Bitbucket servers. Let's connect the local repo with the remote one on bitbucket.

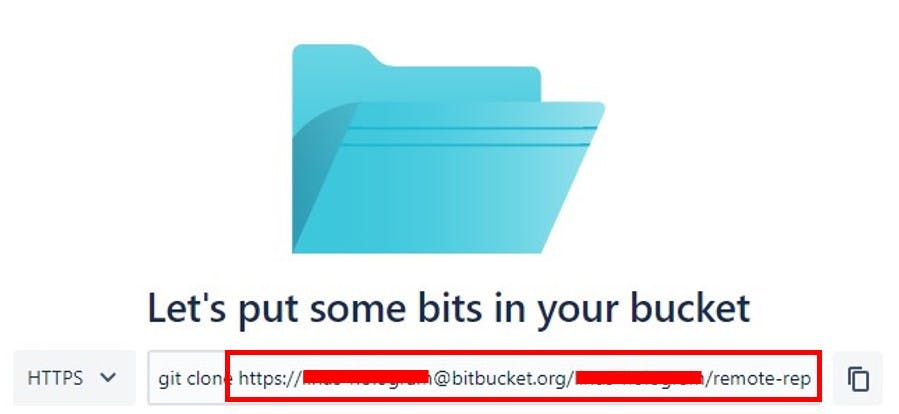
Therefore, head back to your browser and copy this link (without the git clone in front of it) from your bitbucket repository page:

Open the terminal again and run:
> git remote add origin <the url you just copied>
Now, GIT knows that you wish to work with a remote repository. However, the commits you've made locally so far aren't automatically pushed to the one on Bitbucket. In order to push it, run:
> git push -u origin master
If you're working with a Bitbucket remote repository for the first time, there'll probably popup something like a sign-in window in which bitbucket asks you to authenticate yourself. Just enter your credentials and sign in :)
Now reload the Bitbucket repository page and you'll see the text document you've just created - including its size, the commit message as well as when it was commited.
If you select the Commits tab in the left bar, you'll be able to see even more details such as who commited:

From now on, just run the git push command (as mentioned above) and all commits made to your local repository will be pushed to your remote repo :)
In order to receive changes made to the remote repo but not to the local one (e.g. by team members), run:
> git pull
This pulls all the "new" commits and updates your local repository accordingly.
And btw: you can use the same procedure to work with remote repositories of other code-hosting services (GitHub, GitLab etc.) as well!
You're good to go now 😉

Outro
Congrats, you've enhanced your GIT knowledge by remote repositories 🎂 In the next part of this tutorial series, we'll take a closer look at branching. The tutorial is in the works right now and this story will be updated once it becomes available.
I would love to hear your feedback! Let me know what you liked or what could've been better with this tutorial - I always welcome constructive criticism! If you have any questions, just comment them and I'll try my best to help you out :)
In love with what you just read? Follow me for more content like this 👀

Sources
© GIFs from Giphy

