


Intro
Now that you've installed your MongoDB database server and played around with basic Mongo-Shell commands, it's finally time to worry about a crucial aspect when dealing with databases: Securing & Locking down the stored data. Not only is the protection of e.g. user data enforced by law (at least in Europe), it's also indispensable for companies that want their users/customers to trust them. Over and above that, insufficient security measures cause lots of problems that are hard to deal with - just imagine Facebook not having any security measures and an intruder deleting all of their database entries. Facebook would no longer exist.
Thankfully, they are smart enough to care about database security. So are we! In this tutorial, you'll learn the core concepts of locking down your MongoDB database.
⚠ Please note: this tutorial is not intended to be skimmed. The examples are building up on each other and you probably won't be able to understand them if you don't follow the tutorial step-by-step. So if you're looking for a superficial tutorial, I'm afraid this is not the right tutorial for you 😊
Prerequisites:
- MongoDB must be installed, as explained in Part 1 of this tutorial series
- watching the most legendary music video ever produced won't hurt 🐍
So let's get started and secure our database!
🐍🐍🐍🐍🐍🐍🐍🐍🐍🐍🐍🐍🐍

What will be covered in this tutorial?
The MongoDB docs provide a security checklist that can become very helpful when trying to secure your database. The content of this checklist can be structured into six main parts:
- Authentication & Authorization
- Transport Encryption
- Encryption at Rest
- Auditing
- Server & Network Config/Setup
- Backups and Software Updates
In this tutorial, we'll cover the first two parts in detail as these are the most important ones to get started. Encryption at rest is an enterprise-only feature of MongoDB which means that it's hard for me to provide you with a detailed tutorial on this topic. Nonetheless, I will briefly discuss its importance and provide you with resources to enforce encryption at rest for your own database.
4-6 are rather advanced and not needed to enforce basic security measures. Maybe I'll explain them in another tutorial. The first three are great to start with 🎉
🐍🐍🐍🐍🐍🐍🐍🐍🐍🐍🐍🐍🐍

1. Authentication & Authorization
Understanding the basics
Before we create our first user account, I'd like to step back for a second and clarify the difference between Authentication and Authorization - they're not entirely the same, though related.
Authentication
Authentication is the act of proving an assertion, such as the identity of a computer system user. In contrast with identification, the act of indicating a person or thing's identity, authentication is the process of verifying that identity.
Simplified: Authentication verifies the identity of a database user.
Authorization
Authorization is the function of specifying access rights/privileges to resources, which is related to information security and computer security in general and to access control in particular. More formally, "to authorize" is to define an access policy.
Authorization determines what the identified & verified users may do to the database (what actions they are allowed to perform, for example)
Now that we know the difference between authentication and authorization, it's time to clarify the term "user account". Let's say we're building an online shop that sells Taylor Swift merch and allows customers to sign up and create an account. Now, although you might think so, these accounts are not what I'm referring to when talking about "user accounts". In this context, "user accounts" are accounts created directly on the MongoDB Database Server. These accounts are allowed to directly interact with the database - regular customers (hopefully) do not have permission for that as that would mean they'd be capable of deleting collections or even entire databases.
So, what are examples of MongoDB users? Well, it's not necessarily a person. In fact, your app would be a user as well. Obviously, real persons like Data Analysts, Database Engineers etc. could still have their own user account. It's just not necessarily the case.
Okay that was a lot of information, sorry 'bout that. Here's your Taylor Swift GIF 😁
🐍🐍🐍🐍🐍🐍🐍🐍🐍🐍🐍🐍🐍

Role Based Access Control
In order for users to have rights, they need roles. This means, if you create a database user without assigning roles to it, the user won't be allowed to do anything to your database.
But, what are roles? Every role consists of one or more privileges. A privilege is a combination between a resource and an action. I know this sounds weird, but here's an example:
Let's say there's the role "manager". It has one privilege which allows database users to insert products into the shop database's products collection.
Let's break this example down to resource and action:
- resource: shop database's products collection
- action: insert
See, it's not that hard. We can conclude that the resource is the place in the database at which the user is allowed to perform actions.
And here's an important gotcha: a user should only possess those roles (privileges) that are really needed for that user. For example: a data analyst should only be able to read data - there's no write access needed (in most cases), so why putting your data at risk?
And here's the next important gotcha: we're not enforcing all of these security measures just because of the bad guys out there. For example, even if you trust your data analyst so much that you'd put your life into their hands, don't be generous with roles (privileges). Just imagine them misclicking a few times and thereby deleting an entire database. Bad things might happen by accident, and being stingy with database permissions can be a life-safer in this case. Better safe than sorry.
🐍🐍🐍🐍🐍🐍🐍🐍🐍🐍🐍🐍🐍

Creating our first user
In MongoDB, a user can only be created by another user with sufficient permissions (roles; privileges). Unfortunately, we don't have a user with sufficient permissions yet. Does that mean we can't create our first user 😥? Nope - fortunately, MongoDB got our backs on this one 😉
As long as there's no database user created, MongoDB allows you to create one - but be careful here! Your first user should have the suitable permissions to create other users. You won't be able to create another user if you forget the permissions on your first one ☠
So, we know that there's only one user we can create initially, and messing up here is not recommended 😅 Now, where do we create our first user? In MongoDB, every user is created on a database (most people use the
admin database for that). However, this doesn't mean that the user's permissions are limited to that database - this is just the database against which the user has to authenticate.
Okay, now bring up your command line and run the following command (on Windows, skip sudo):
> sudo mongod --auth
This will run MongoDB with security features enabled, i.e. you have to authenticate in order to work with the server. ⚠ If, for some weird reason, there's already a mongodb server running in the background and causing trouble, stop it by using these commands:
> use admin
> db.shutdownServer();
Congrats! You've started your MongoDB server in security mode! Yayyy 🎉🎉🎉
Now pull up another terminal window and run:
> mongo
This will connect the Mongo-Shell to your database server. You might be wondering why we don't get a permission denied error as we didn't authenticate ourselves. Well, we're connected, but we don't have any rights. We are not allowed to perform any action to the database. You can convince yourself by running:
> show dbs
And you'll see: nothing. As you don't have any rights, MongoDB will not return anything due to your missing permissions. In this case, not even the names of the databases that are stored on your server.
So let's create our first user: As we remember, MongoDB allows us to create one initial user. This means that our first user needs sufficient permissions (privileges) to create other users and administrate databases. Therefore, we use one of MongoDB's default roles, userAdminAnyDatabase, which gives us the right to administrate any database on our MongoDB server. Run the following command to create your first user:
> db.createUser({user: "yourUsername", pwd: "yourPassword", roles: ["userAdminAnyDatabase"]})
As you see, we provide the createUser command with our desired username, password and a role (we could even add multiple roles here).
To recap our last command: we've created our first user that has the userAdminAnyDatabase role assigned which allows the administration of any database on the server.
🐍🐍🐍🐍🐍🐍🐍🐍🐍🐍🐍🐍🐍

Now that our user is created, we have to authenticate ourselves with the newly created user. Therefore, make sure that you're using the admin database and run the following command:
> db.auth('username', 'password')
If you're credentials are correct, this command will print 1.
Okay, if we now try to rerun the show dbs command, the Mongo-Shell should print all of your dbs:
admin   0.000GB
config  0.000GB
local   0.000GB
An alternative way of authenticating yourself to MongoDB would be to provide the Mongo-Shell with your credentials alongside the starting command, like so:
> mongo -u username -p password --authenticationDatabase yourUserDatabase
As I already mentioned earlier, users must be created on a database against which they have to authenticate. Therefore, we have to tell the Mongo-Shell against which database we would like to authenticate against, i.e. on which database our user has been created. In our concrete example, you would fill admin for yourUserDatabase. The other parameters are self explanatory: -u takes the username and -p takes the password of your user.
Creating our second user
Now that we have one admin user, let's create another user for our tsmerch.com database. Therefore, use the database:
use tsmerch
In there, let's create an account for our manager:
> db.createUser({user: "manager", pwd: "yourPassword", roles: ["readWrite"]})
Note: the
readWriterole is another built-in MongoDB role. It allows the user to write or read to the database it is created in. A full list of MongoDB's default roles can be found here.
Congrats! You've successfully created your second user 🎉🎉🎉
In order to use your second user, you have to logout with your current admin user though:
> db.logout()
Otherwise, there's more than one user authenticated which causes MongoDB to refuse any database interaction attempted by the current shell.
Once you're logged out, just use one of the two authentication methods I discussed above to work with your manager user.
🐍🐍🐍🐍🐍🐍🐍🐍🐍🐍🐍🐍🐍

Managing Users - Granting & Revoking roles, listing all roles of a user, changing the password
1. Grant & Revoke roles
Let's recap: our manager user has the right to read and write to the tsmerch database. What if we'd like to grant it read access to the statistics database as well? In this case, we'll have to grant a new role to our manager user.
However, we can't do that with the manager user itself as it doesn't have sufficient permissions to change its own roles (everything else would be terrifying from a security standpoint). Instead, we have to logout and use the admin user we created initially. This one has sufficient permissions to modify any database on the server and hence is able to change the privileges of the manager user.
In order to do this, run the following commands:
> db.logout()
> use admin
> db.auth('yourAdminUser', 'yourAdminUserPassword')
Okay, now that we're logged out with our manager user and signed in with our admin user, we can finally grant a new role to the manager:
> use tsmerch
> db.grantRolesToUser("manager", [{role:"read", db:"statistics"}])
The grantRolesToUser function takes two arguments: a username and an array of roles that should be added to the specified user. Each of the items in this array must be an object containing two elements: the role and the database it is valid for.
In our concrete example, the manager is now able to read and write data to the tsmerch database (this is the role we assigned when creating the manager user) and only read data from the statistics database (this is the role we just granted to the manager user).
⚠ Revoking roles works just as granting roles. Make sure you're in the database of the user you would like to revoke a role from and specify which role(s) you would like to revoke:
> db.grantRolesToUser("username", [{role:"roleTitle", db:"databaseName"}])
2. Identify a user's roles and privileges
If you're not sure what roles and privileges you have assigned to a specific user, just run the getUser command while you're using the according database:
> db.getUser("username")
This will print all assigned roles as well as the database for which they're effective. Running this command should print an output similar to the following one:
{
        "_id" : "tsmerch.manager",
        "userId" : UUID("d631ef8c-9cf7-4a39-8021-af4aad349855"),
        "user" : "manager",
        "db" : "tsmerch",
        "roles" : [
                {
                        "role" : "readWrite",
                        "db" : "tsmerch"
                },
                {
                        "role" : "read",
                        "db" : "statistics"
                }
        ],
        "mechanisms" : [
                "SCRAM-SHA-1",
                "SCRAM-SHA-256"
        ]
}
If you're not sure which privileges are attached to a specific role, make use of the getRole function:
> db.getRole( "readWrite", { showPrivileges: true } )
This will print all the privileges attached to this role. I won't include a sample here as the Mongo-Shell prints out quite a lot in response to this command. Try it out and I'm sure you'll quickly recognize if it worked or not 😉
3. Changing a user's password
You can change a user's password by running the following command as long as you're in the according database:
> db.changeUserPassword("manager", "yourNewPassword")
The full documentation on managing users & roles can be found here.
Also, we have now covered how you're able to assign predefined roles to a user of your MongoDB server. In a lot of cases, they perfectly cover your needs. However, if you need to create custom roles with selected privileges, you can do so by following this official tutorial.
🐍🐍🐍🐍🐍🐍🐍🐍🐍🐍🐍🐍🐍

2. Transport Encryption
Sure, restricting access to your MongoDB database server is fine and all but it won't ensure that nobody is reading the data that is transferred between your server and client. Therefore, we'll now set up encryption for the data that is transmitted - luckily, all the features we need are built in. So let's get started!
In order to establish encryption during data transfer, MongoDB uses TLS (Transport Layer Security). I won't go into detail on the theory behind this technology, just know that it's a protocol that is used to encrypt data while it's being transferred. If you want to learn more about TLS, you can find a helpful document here.
In order to use TLS, we have to generate ourselves a public-private-keypair. We'll do that by using openssl. On MacOS and Linux, this is installed by default. On Windows however, we have to download and install it.
Installation of OpenSSL on Windows (⚠ MacOS & Linux users should skip this part)
Head over to the download page for OpenSSL for windows. I know this page doesn't look too legit but it is what it is. On the page, if you scroll down a bit, you'll find a table listing all the available OpenSSL versions for Windows. For the sake of this tutorial, we're going to download the "Win64 OpenSSL v1.1.1d Light" version. Click on the "EXE" download link:
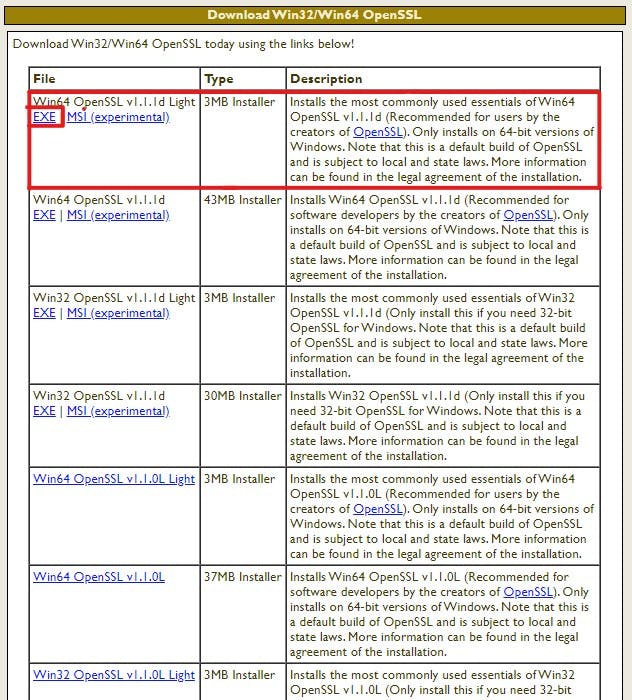
Once you've downloaded the .EXE file, execute it. Ugh, I hate how unlegit this sounds... 🤮
Proceed through the installation and leave everything as-is. Now, open your terminal in administrator mode and switch to the "bin" sub-folder of the folder you've installed OpenSSL in. By default, this should be your "Programs" folder:
> cd "C:\Program Files\OpenSSL-Win64\bin"
Keep the terminal open. In the next step, we'll generate the necessary files. You will only be able to generate the files as long as you're in the bin folder of OpenSSL.
Generating the keys
MacOS & Linux users: open your terminal. Windows users: make sure you're in the "bin" folder of your OpenSSL installation.
Now copy and paste this command:
> openssl req -newkey rsa:2048 -new -x509 -days 365 -nodes -out mongodb-cert.crt -keyout mongodb-cert.key
Now OpenSSL will ask you a few questions that are needed in order to create the keys. Just answer them, it's not too important what you enter here for now (⚠ if you'll ever do this for an application that will be deployed to production, it does matter though) except for the "Common Name" field - here, you should enter localhost. If you were to configure this certificate for a server in the web you would have to enter the server's address here - otherwise the connection won't be established.
Once you've finished the OpenSSL key-configuration, there'll be two newly generated files in your current directory: one mongodb-cert.crt and one mongodb-cert.key. We're now going to join them together by running the following command(s):
On MacOS & Linux
> cat mongodb-cert.key mongodb-cert.crt > mongodb.pem
On Windows
> type mongodb-cert.key mongodb-cert.crt > mongodb.pem
Running this command now generated a new mongodb.pem file. This file is the one we need to configure the TLS encryption for MongoDB.
You could now copy this
.pemfile to another location in your system. Just know that you will have to change directory into that location in order to run your MongoDB server with TLS enabled.
Okay, that was some hard work here. Take a breathe as well as a short break. Or just move on from here.
🐍🐍🐍🐍🐍🐍🐍🐍🐍🐍🐍🐍🐍

Starting your MongoDB server with TLS enabled.
Make sure your current terminal is in the location of your generated mongodb.pem file. From there, run the following command to start your server with TLS mode enabled:
> mongod --tlsMode requireTLS --tlsCertificateKeyFile mongodb.pem
On MacOS and Linux, you might need to put
sudoin front of this command.
The parameters we used:
- --tlsMode: as the name already indicates, you're specifying the mode of TLS. You could choose between the values
disabled,allowTLS,preferTLS,requireTLS. In our case, we've usedrequireTLSmeaning that all non-TLS connections are rejected. - --tlsCertificateKeyFile: here you want to provide MongoDB with the path to your
.pemfile we generated earlier. If you're already in the same folder as this file, just enter its name.
Additional parameters that will be helpful if you'll enable TLS for a database that will be used for production:
- --tlsCertificateKeyFilePassword: if you were to create a certificate with a password, you'd have to specify the used password here. In our case, we don't need that as we generated a certificate without a password.
- --tlsCAFile: If you got your TLS certificate through an official authority, they'd provide you with a CA-file. Here you would, just as we did it with the
.pemfile, provide the name or path to the CA file. Note that you would use this option in addition to the--tlsCertificateKeyFile.
Connecting to our server from the Mongo-Shell, using TLS
Nice. Your database server is now requiring all connections to be TLS encrypted. Unfortunately, this means we can't connect the way we used to by simply running mongo. Instead, we need to start the shell with TLS-mode enabled.
Therefore, open a new terminal that is still in the location of your generated mongodb.pem file. In there, run:
> mongo --tls --tlsCAFile mongodb.pem --host localhost --port 27017
The parameters we used:
- --tls: start the Mongo-Shell with TLS-encryption enabled
- --tlsCAFile: here you want to provide MongoDB with the path to your
.pemfile we generated earlier. If you're already in the same folder as this file, just enter its name. Some of you are probably wondering why we're not using thetlsCertificateKeyFileoption here. The reason is because we're using a self signed certificate and MongoDB does not consider self-signed certificates as trustworthy. If you have a official certificate from an authority, you are free to again use thetlsCertificateKeyFileas well as thetlsCAFileoptions. - --host: remember when we generated our certificate and specified "localhost" for the "Common Name" field? This is the reason why we're specifying it here. If you want to use the Mongo-Shell with TLS mode, specify the common name you entered as the host option's argument.
- --port: the port your MongoDB server is running on. MongoDB prints out the port during the startup of the server.
Very nice! You've successfully enabled TLS on the Mongo-Shell. All the data transferred between the Mongo-Shell and your server is now TLS-encrypted 🎉🎉🎉
🐍🐍🐍🐍🐍🐍🐍🐍🐍🐍🐍🐍🐍

3. Encryption at rest
Now that we've encrypted the transport of data between server and client, it's time to worry about encrypting data at rest, i.e. the storage of MongoDB. This is a feature that is only available in MongoDB for Enterprise - detailed instructions on how to enforce encryption at rest can be found at the official docs here.
While configuring Role-Based-Access as well as TLS encryption on your MongoDB server is a good start, encrypting the stored data is crucial to protect the data of e.g. your users. Even if somebody would be able to steal data from your database, the person couldn't to do anything with it as it's encrypted. Thanks to MongoDB's strong AES256-CBC encryption, your data is safe at any time.
Outro
Congrats, you've successfully taken the security of your MongoDB server to the next level 🎂 I sincerely hope you had a nice time working yourself through this tutorial. As always, if you have any questions, just comment them and I'll try my best to help you out :)
I would love to hear your feedback! Let me know what you liked or what could've been better with this tutorial - I always welcome constructive criticism! If you have any questions, just comment them and I'll try my best to help you out :)
In love with what you just read? Follow me for more content like this 👀

Sources
© GIFs from Giphy