
Intro
As you might already know, MongoDB is one of the most powerful and popular NoSQL-Databases out there. It offers wide functionality and runs on almost any OS. Especially if you're seeking for a powerful database, capable of scaling together with your application, MongoDB is definitely a considerable option.
In this tutorial, I'll show you how to install MongoDB step-by-step.
Prerequisites
- basic command line skills
- advanced computer skills
⚠️ Part two of this MongoDB tutorial series (Working with the Mongo-Shell) is already in the works. It will be linked here once it's published.
🔐 If you would like to know how you can secure your MongoDB server, check out this tutorial.
So, let's get started!

1. Downloading the installer
Head over to MongoDB's download page and download the community server. You have to specify your type of operating system and select the package you want to download. For MacOS, there's only one: TGZ. For Windows, you can choose between ZIP and MSI - in this tutorial, we'll be using the MSI download.
⚠️ NOTE: ⚠️ MongoDB is no longer available for 32-bit operating systems. If your OS is 32-bit, you'll have to download a MongoDB version lower than 3.4 - please note that the steps explained in this tutorial might not be applicable to older MongoDB versions.
2a. Starting the installation (⚠️ Windows)
On Windows, just execute the downloaded .MSI file and proceed through the installation steps. You'll be asked whether you want to run the complete setup or go with the custom setup:
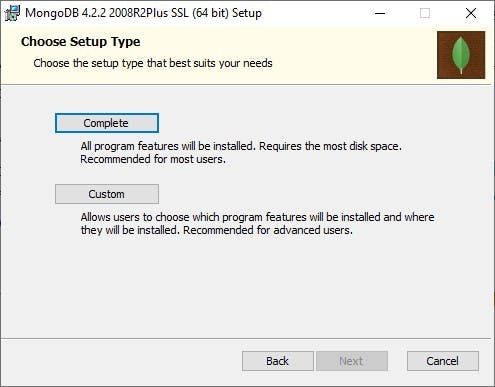
Choose "Complete".
Then, you'll get to this screen:
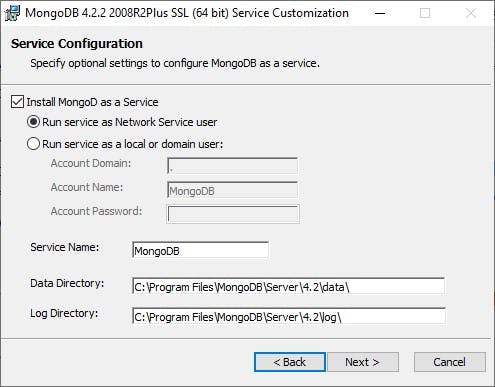
Here, you can leave everything as-is and click "next". MongoDB will now ask you if you want to install MongoDB Compass. This is totally up to you and you can install Compass anytime.
What is MongoDB Compass?
Compass is the official GUI for MongoDB and allows you to visually explore your data. It's also possible to interact with your data and modify it with full CRUD functionality.
Adding the data folder
Next, we have to create a folder in which MongoDB can store its data. This folder can be created anywhere, just make sure you'll be able to find it as we'll need it later on in the installation.
- The folder has to be named data. In there, create another folder db.
Very good! We're halfway there.
Creating the environment variable
Open the terminal and run the following command:
> mongo
You should get an error, that the command could not be found. In order to be able to run the MongoDB executables in our terminal, we have to create an environment variable.
Therefore, tap the Windows key and search for environment. You should be suggested the "Edit environment variables for your account" option:
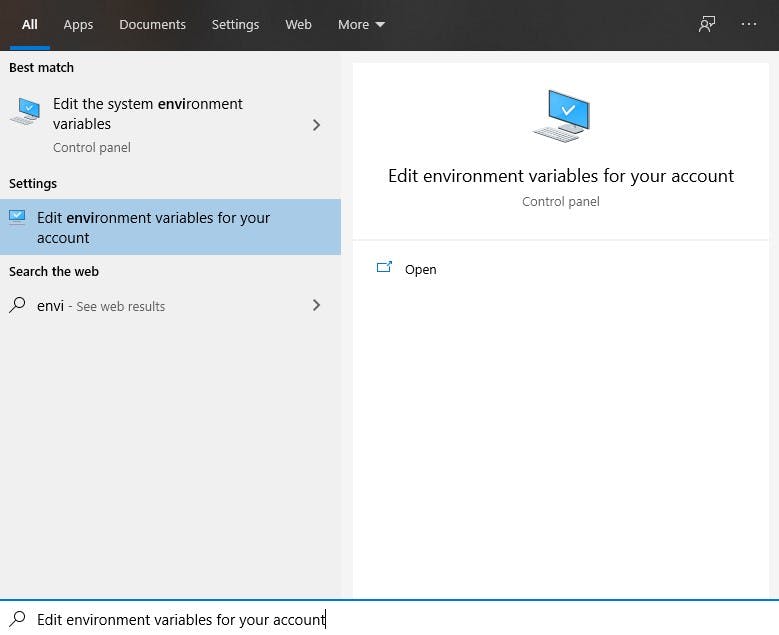
Once you've clicked on it, a new window will open in which we can create our new environment variable. Yayyy!

Leave that window open and head over to the explorer. In there, move to the folder in which you've installed MongoDB, more specifically, into the bin folder of it. Then click the top bar displaying the entire path to the current folder:
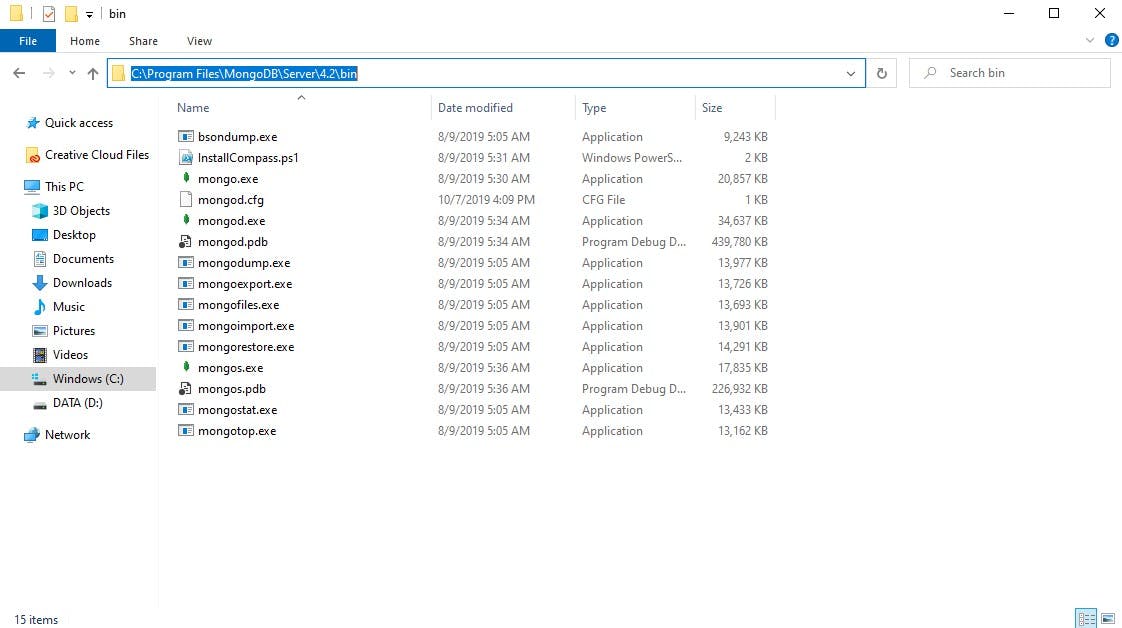
Copy that entire path.
Now, head back to the window with your environment variables. In there, select the Path option in the "User variables for USERNAME" section. Do not mess with the system variables!
Click "Edit":
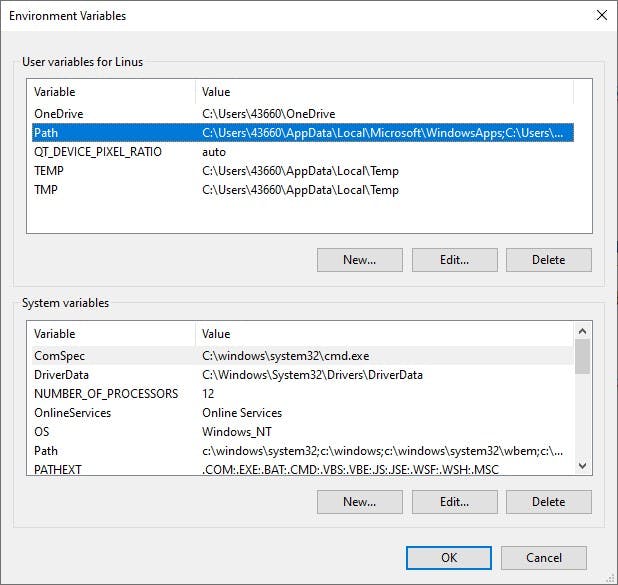
This will again open a new window. Click on "New" and paste the path you've just copied:
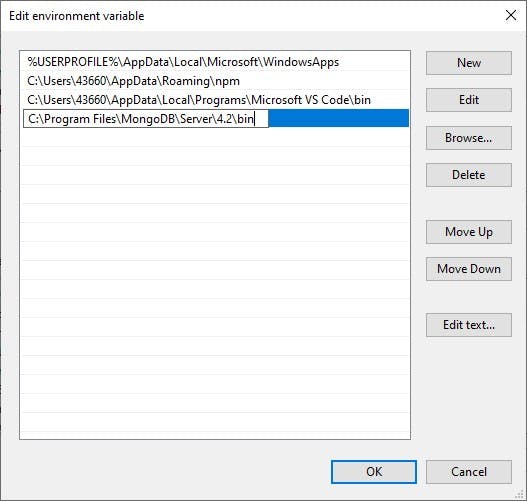
Press "OK"
Congrats! You've completed all necessary setup-steps to work with MongoDB on your machine. Scroll down to section 3 of the tutorial - in there, we'll verify the setup together.

2b. Starting the installation (⚠️ MacOS & Linux)
On MacOS and Linux, extract the downloaded .TGZ folder. Next, copy all of the files from that folder to any place in your operating system. It doesn't matter where this place is, just make sure that you've copied all of the files from the extracted folder.
Adding the data folder
Next, we have to create a folder in which MongoDB can store its data. This folder can be created anywhere, just make sure you'll be able to find it as we'll need it later on in the installation.
- The folder has to be named data. In there, create another folder db.
Creating the path variable
Open the terminal and run the following command:
> mongo
You should get an error, that the command could not be found. In order to be able to run the MongoDB executables from the downloaded folder, we have to extend our .bash_profile file. You can find it in your user folder. If it does not exist, simply create it. ⚠️ Make sure that it's named exactly as mentioned above.
⚠️ If you're using Apple's new zsh shell on macOS Catalina or newer, the file must be called
.zprofileinstead of.bash_profile.
In there, we'll add a new path variable that points to the bin folder of our MongoDB-installation folder. This could look something like this:
export PATH=/Users/YourUsername/development/mongodb/bin:$PATH
Replace everything between export PATH= and :$PATH with the right path to your mongodb bin folder. Don't remove any existing code and don't add anything else to the file. Just append one line, save & close.
Congrats! You've completed all necessary setup-steps to work with MongoDB on your machine. Scroll down to section 3 of the tutorial - in there, we'll verify the setup together.

3. Verifying our setup
First of all, congrats for making it this far :) In order to verify the setup close all open terminal windows and open a brand new one. This is necessary as we've changed the path variables - closing old terminals & opening a new one will read in all variables again.
Now, run the following command:
> mongo
If you see anything but a "Command not found" error, chances are the setup was successful.
On MacOS, you'll probably get an error that a connection to the database server could not be established - this is normal as there is no MongoDB server up and running yet. To fix that, run this command in your terminal:
> mongod
If you've created your data folder (including the db folder inside it) in a location other than your root directory, you have to tell MongoDB where to find that folder:
> sudo mongod --dbpath "/your/path/data/db"
If you're still getting any error, please create a comment and attach a screenshot of the error message you get - I'll try my best to help you out :)
On Windows, MongoDB has been installed as a service, meaning that the server is already up and running. Therefore, you should not get any error when running the mongo command. If you get an error nonetheless, please create a comment and attach a screenshot of the error message you get - I'll try my best to help you out :)
Outro
Now that you've successfully installed MongoDB on your machine, I'll show you the basic functionality of the MongoDB shell in my next tutorial. The tutorial is already in the works and I'll update this story once it gets published.
I would love to hear your feedback! Let me know what you liked or what could've been better with this tutorial - I always welcome constructive criticism! If you have any questions, just comment them and I'll try my best to help you out :)
In love with what you just read? Follow me for more content like this 👀

Sources
© GIFs from Giphy

